WL320gE USB Storage HOWTO
This article describes how you can successfully solder an USB cable on your WL320gE router, install and configure the required packages, and finally mount it under OpenWRT. It allows you to turn your router into a light weight NAS, or whatever purpose you have in mind. A sweet thing is that the WL320gE already has a USB host controller onboard.
WARNING: Before you open your router and happily start soldering, flashing and who knows what, please realize that your warranty will be void.

Requirements
- WL320gE router
- Standard soldering equipment
- Voltmeter
- An USB extension cable, such as
http://www.amazon.co.uk/Bandridge-USB-Extension-Lead-1-8m/dp/B0000BX723
Soldering
1. Open your router
The first step is easy - open your router. There are two tiny screws on the bottom, remove them, so you can pull it open at the top.
2. Prepare the USB cable
Now we have to cut the USB cable, so we can solder it on the PCB later on. Make sure to keep enough space between the USB connector and the place where you cut the cable. You'll see the cable has four wires inside:
| Red | 5 Volt |
|---|---|
| Green | Positive |
| White | Negative |
| Black | Ground |
3. Solder the wires to the PCB
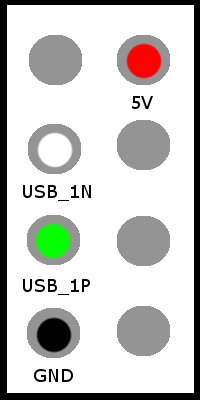
Now comes the hard part - you'll have to solder the USB cable wires onto the PCB. On my router, the holes where still filled with tin, remove it before soldering. The USB wires can be soldered just below the CPU. You can recognize it by the eight small circles:

As you can see, ASUS was kind enough to mark the soldering spots already for us, i.e. 5V, USB_1P, USB_1N and GND. Now it is easy to determine which wire goes where:

Note: It appears that we'll have to use the right 5V hole, as the left one doesn't supply any voltage at all. Most probably, as a 2-heads USB connector was originally meant to be placed there.
4. Finishing touch
When you've soldered all wires correctly (use a voltage meter to verify), we need to put the case back on. I've made a small hole on the side for the USB cable.
Installing Software
I assume that you've already installed OpenWRT on the WL320gE and soldered the USB cable correctly. Insert an (empty) USB memory stick first. We now need to install the appropriate kernel modules, so the Linux kernel can recognize and use the USB host controller:
# ipkg install kmod-usb-ohci
# ipkg install kmod-usb-storage
After installing those packages, use dmesg to verify that the kernel sees the USB memory stick:
usb-ohci.c: USB OHCI at membase 0xb8003000, IRQ 6
usb-ohci.c: usb-00:03.0, PCI device 14e4:4716
usb.c: new USB bus registered, assigned bus number 1
hub.c: USB hub found
hub.c: 2 ports detected
SCSI subsystem driver Revision: 1.00
Initializing USB Mass Storage driver...
usb.c: registered new driver usb-storage
USB Mass Storage support registered.
hub.c: new USB device 00:03.0-1, assigned address 2
scsi0 : SCSI emulation for USB Mass Storage devices
  Vendor: Ut163     Model: USB2FlashStorage  Rev: 0.00
  Type:   Direct-Access                      ANSI SCSI revision: 02
Attached scsi removable disk sda at scsi0, channel 0, id 0, lun 0
SCSI device sda: 983808 512-byte hdwr sectors (504 MB)
sda: Write Protect is off
Partition check:
 /dev/scsi/host0/bus0/target0/lun0: p1
If you see the above messages or similar, congratulations, it works!
Building a small NAS
At this point, it's up to you what to do next. I use my WL320gE as a mini-NAS, so I've installed the ext3 filesystem driver, and mounted it under /mnt/usb:
# ipkg install kmod-fs-ext3
# mount /dev/scsi/host0/bus0/target0/lun0/part1 /mnt/usb
You can also add it to /etc/fstab, just like a normal UNIX server:
/dev/scsi/host0/bus0/target0/lun0/part1 /mnt/usb ext3 defaults 0 0
Links
Special Thanks
Jan Linnenbank :
Thanks to my dad for helping me with soldering!
Adrie van Doesburg :
For teaching me about serial UARTS on embedded Linux routers and for donating some routers to the HULK.